When using images in a Open LMS course, always use mozart (the DL web server) to store the image. You will then be able to link to the image in Open LMS. It is also acceptable to create a URL link to an image if it exists on another website by linking directly to the page with the image. Remember, images used in your course must comply with all copyright provisions. We recommend that you use images that are in the public domain and contain no usage restrictions.
How To Insert An Image
Images can be inserted into a label, quiz, forum, assignment, or page. The process for inserting an image into any resource or activity in Open LMS follows the steps outlined below.
Start by selecting a resource or activity where you would like the image to appear.
NOTE: For the next steps, you will need a mozart FTP account to upload your image files and store them on Mozart. If you do not have a mozart account, send a request to Scott Robinson (robinsons@sandhills.edu). He will also train you on how to use the server.
Step 1
Open WinSCP FTP on your desktop.
Step 2
Locate the image that you want to use on your computer and upload the file to mozart. Look at the path at the top of the image, /wwwroot/dl/wordpress/images, this is the location of the image on the server. To embed the image, you will need to generate a URL that points to this location.

Step 3
View the How to create a mozart URL page if you need assistance creating a mozart URL.
Step 4
Now that you can make a URL to the mozart file, you will need to use that URL to place the image in your Open LMS course. In this example, we will use a page. Click add and activity or resource at the bottom of a topic and select page.

Step 5
Give the page a name and scroll down to the page content area. The image must be inserted into the content area in order to display to students. Do this by clicking on the”insert/edit image” button in the text editor.

Step 6
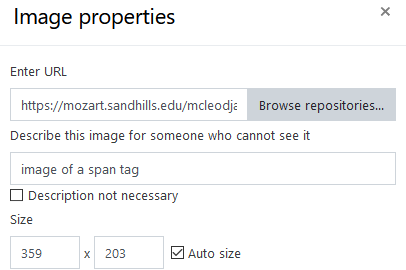
The image properties dialog box will pop up. Type the URL into the Enter URL field. Insert an image description that describes the image being used. In the example below, the text reads “image of a span tag” to describe the image below. Note the URL begins with https:// which denotes a more secure link connection.

Step 7
The image will display in the text editor. If it does not display, there is a problem with the URL. Click on the broken image and click the “insert/edit image” button and change the URL.
Revised: June 2020
