Collaborate will be leaving as a video teaching option. We have integrated MS Teams into Moodle to provide instructors with a tool for video conferencing and sharing information.
Important Notes
- When you generate a Teams meeting in Moodle it will automatically send participants in the course an email to their Sandhills email account with the information. However, the email will not show which course it is for. Be sure to place course information in the subject when you create the Teams meeting.
How to Set Up a Teams Meeting
- In Moodle edit mode, click to “add an activity or resource.”
- In the selection screen, choose “Microsoft Teams” from the options
- Title your activity and then choose save.
- After it returns you back to the main page, click to open the activity you just created.
- Click the blue “+ new meeting” box to the right.
- Fill out the meetings setup form. Be sure to list the course name in the title so students will know which course it is for.
- When you have a course with students the “+ add entire class” button can be used to add all students in the course at once. Otherwise, you’ll have to type individual names/emails in the attendee box.
- Click save.

Conducting a Teams Meeting in Moodle
- Find the activity meeting you wish to launch. Click to open the activity.
- There should be a blue “join” button where you created the Teams meeting. Click the “join” button to begin the meeting.
 NOTE: You WILL need to be signed into Teams. Usually if you’re signed into Moodle you’re also signed into Teams, but occasionally Teams will be logged out. If you are not logged in when you launch the meeting you will be prompted to login first.
Live Meeting Information
To create breakout rooms:
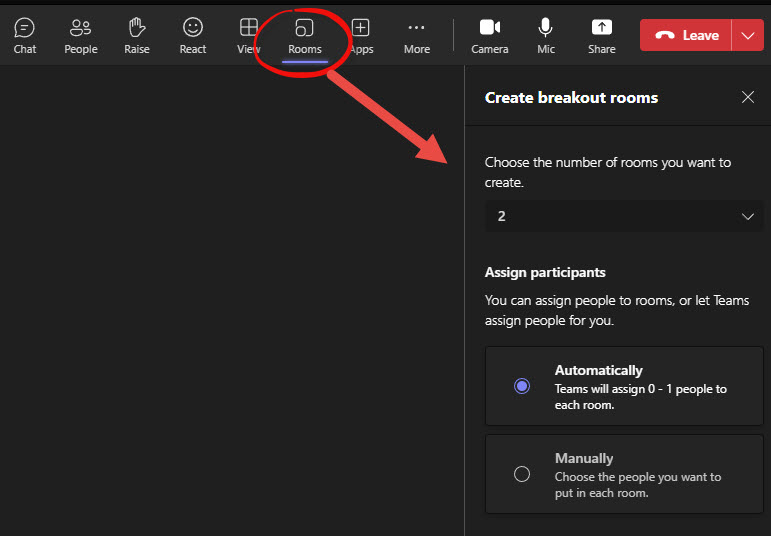
- Click on “rooms” in the top menu
- The right side of the screen will display room options
- choose the number of rooms you want to create with the dropdown
- choose if you want to randomly assign participants to a room, or if you want to manually assign participants to certain rooms
- Click “create rooms.”
To change settings in breakout rooms:
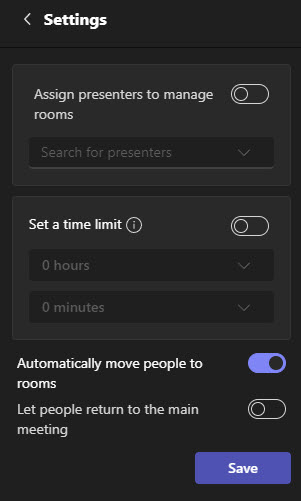
- BEFORE opening the rooms/sending participants to rooms, click the gear icon
- if you want to assign someone to manage each room, toggle the switch on and assign a person (otherwise it defaults to “off”)
- if you want a time limit for the rooms, toggle the switch on and then choose the amount of time from the drop down menu (defaults off)
- decide if you want participants to automatically be moved to and from rooms, or if you’ll give them the option (default is automatic transition) Toggle the switches to “on” for what you want.
- click “save”
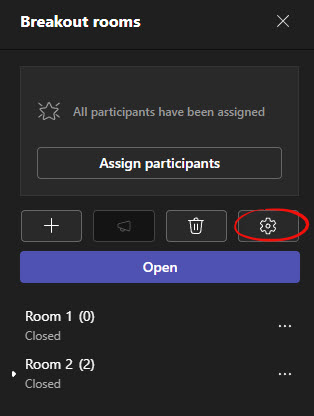
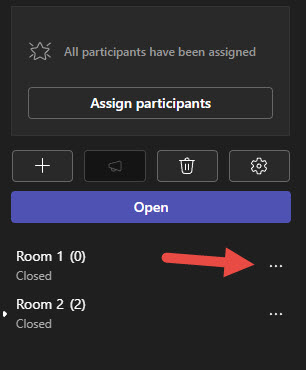
- Each room is automatically named “Room” and then a number (Room 1, Room 2, Room 3, etc…) You can rename each room by clicking the 3 dots next to each room title and choosing ”
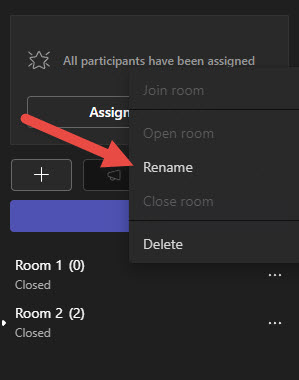
To add/delete a breakout room:
- To add a room, click the + sign at the top of the breakout room page.
- To delete a room, click on the room you want to delete to select it, then click the trashcan OR click the 3 dots and choose “delete”
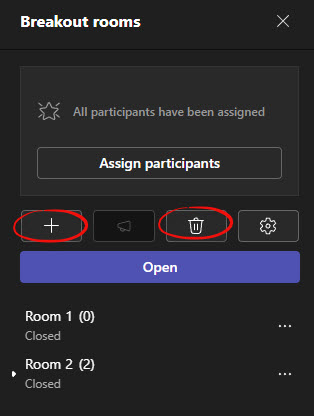
To open/close a breakout room:
- When settings are selected for your rooms you have to open the room by clicking the 3 dots for each room and selecting “open.” A room will say if it is open or closed under the room name.
- Close the rooms by following the same directions and choosing “close.”
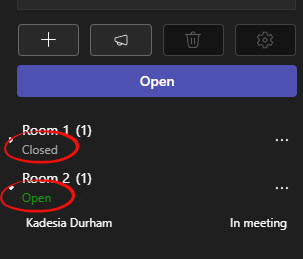
- Close the rooms by following the same directions and choosing “close.”
- When you’re ready to close all rooms, close them and click the X in the top right corner to leave breakout rooms.
To visit a room during breakouts:
- Click on the room you wish you visit from the breakout room menu. Only the person running the meeting will have this as an option.
- You can post announcements in the rooms by clicking the megaphone icon on the breakout room menu. (It is between the + and the trash can)
Recording/Saving/Sharing a Teams Meeting
- To record a meeting click “more” with the 3 dots at the top of the Teams meeting. Then choose “record and transcribe” and then “start recording.”
- Follow the same directions to choose “stop recording” when finished
- Follow the same directions to choose “stop recording” when finished
Where do Teams recordings go?
There are 2 options to retrieve a Teams recording:
- When you’re finished recording, a link will auto-generate into the chat box of the Teams meeting. This link is stored inside Microsoft Stream for 120 days.
- You can share this stream link by copy/pasting the link
- You can download and save the link for future use
- MS Stream is also accessible via the waffle menu in office 365.
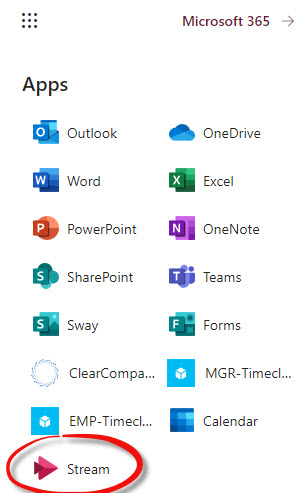
- Go back to the activity in Moodle where the Teams activity was generated. Below the meeting information you will see a box that says “recording.” Click the box to open a new window with the recording video.
 The storage for 120 days still applies, and any recordings beyond 120 days will automatically be deleted.
