Importing Steps
With the new Moodle 4.0 upgrade, the import option is now renamed “Course Reuse”. Please follow the steps below on how to import content into your courses.
NOTE: Use extreme caution when importing content from one course to another. Take your time and think about each step. It is important to only import the content that you need. Importing excessive content can clutter your course, gradebook and cause confusion for both you and your students. You will need the role of Teacher to import content from another course.
Step 1
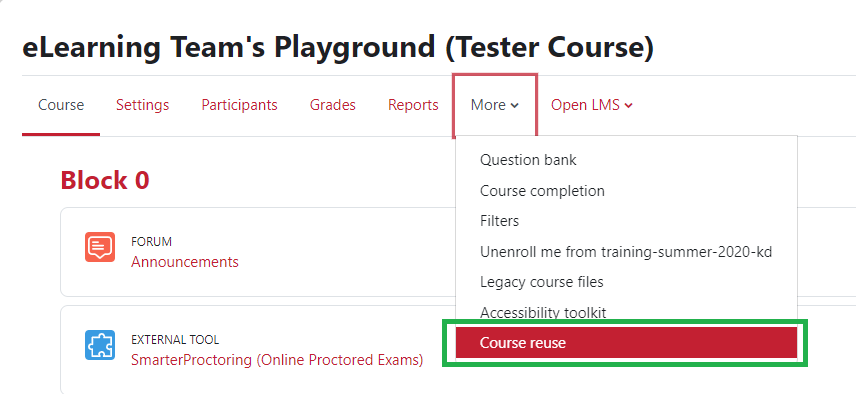
Go to the Moodle course that you plan to add content to. Click the “More” dropdown and select “Course Reuse”.

Step 2
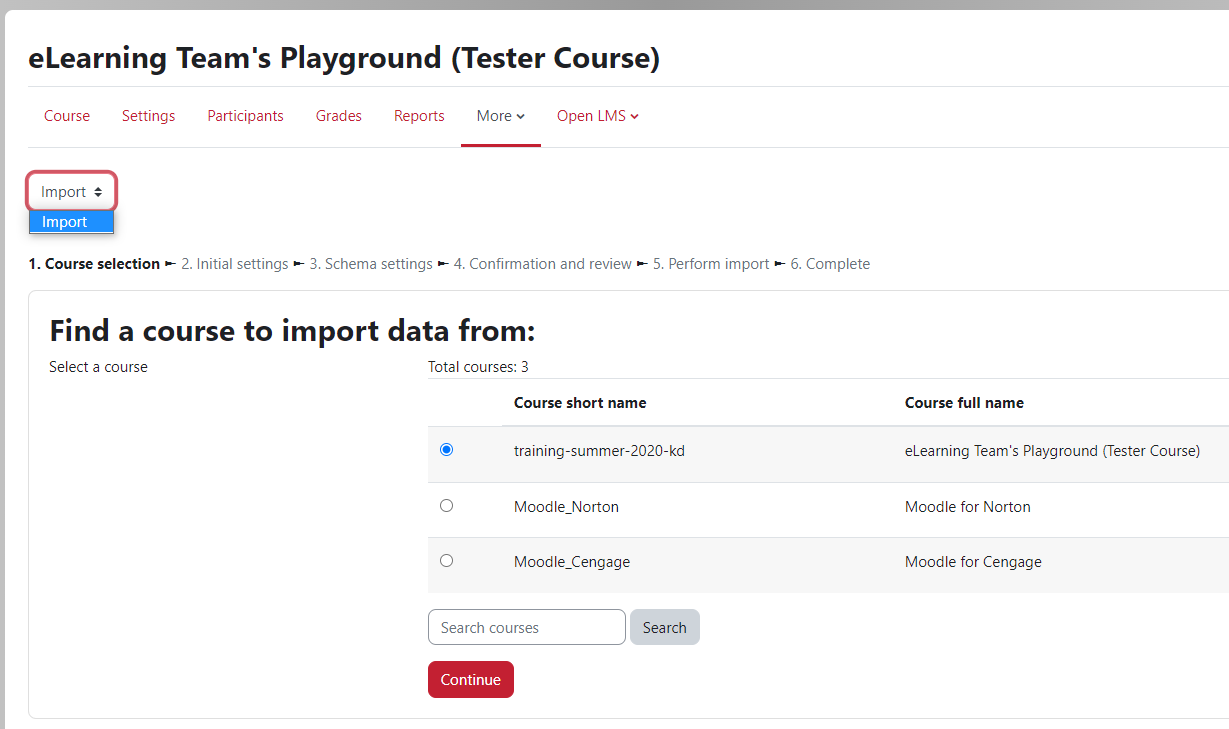
By default, import should be selected on that page’s dropdown list. Select the desired course displayed in the list, or, search for the course by it’s long name or short name (i.e. training-summer-2020-kd). Choose the course that has the content you need and click Continue.

Step 3A
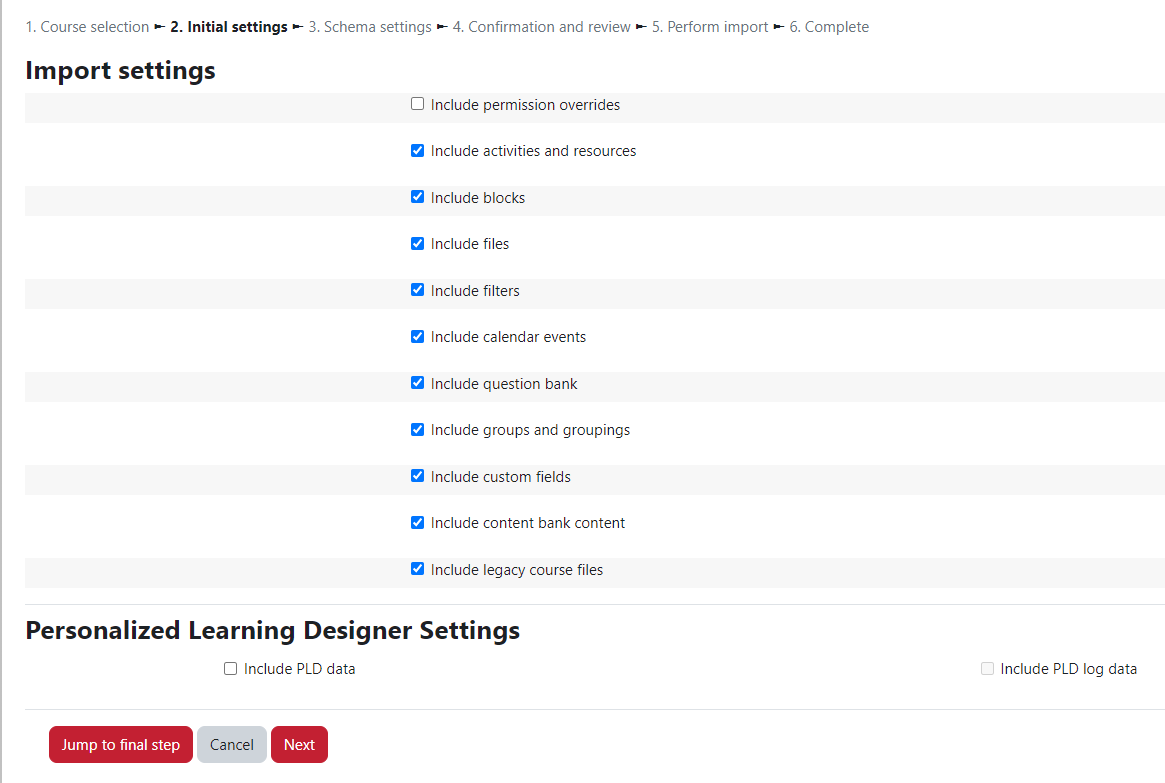
The next screen asks what type of content you want to import.
NOTE: If you are unsure what to check, leave all the boxes checked and delete unneeded content after the import process. Otherwise, review the below for a brief synopsis of what each option does.

- If you select “Include activities and resources” and “Include question bank”, it will import content such as assignments, quizzes, labels, pages, links.
- If you want all the blocks (i.e. Faculty block, Activities block, etc.) from a previous semester check “Include blocks.”
- “Include filters” can be ignored.
- If you uncheck questions banks, all quizzes in the course will not be selectable for import. In the additional boxes (such as groups or calendar events), you can check them if you need that content.
- If you use PLD rules, then check “Include PLD data”.
Again, if you are unsure what to do, leave all of the items selected.
Step 3B
IMPORTANT: If you want the Gradebook settings to be imported along with course activities, you must include all gradebook items in the import. For example, delete the old Orientation Quiz after you import instead of deselecting it during the import process. If you do not import all items listed in the Gradebook, Moodle will revert the Gradebook to a basic setup. If you want to bring over every module and item in your course, you can select the “Jump to final step” button above. Skip to Step 6 if you choose to press this button, otherwise click “Next”.
CAUTION: Clicking the “Jump to final step” button will start the import process immediately.
Step 4
The next page displays a list of course content that was selected. At the top of the page, there is a section with three options: “All”, ”None”, or “Show type options” as shown in the image below. By default, all course activities and resources are selected.
The Show type option lets you choose a type of resource or activity to select or unselect. You can check to bring over all quizzes or no quizzes. The options are available for each resource or activity type. If you are unsure or rather see specific activities or resources, ignore this option.

Scroll through the list and check all items that you wish to import. The topic must be checked first, then check the desired content inside that module. You will have one more chance to ensure you selected everything you need on the next page. You can always delete excessive content in the new course after the import is complete. Once you’ve chosen all that you need, click “Next”.

Step 5
The Review page is the last page in the process. A sample of this page is shown in the image below. Every item with a green check mark will be imported. Any item with a red X will not be imported. If anything is incorrect on this screen, click the previous button to correct it.

Once done, click the Perform import button.

Step 6
Next, a loading progress bar will appear as shown in the image below. Do not leave the loading page until it’s 100% completed. This process may take a long time depending on the amount of content being imported. Do not close out of the browser or leave the page until the process is finished. Once complete, click continue and your course material will be in the chosen course.

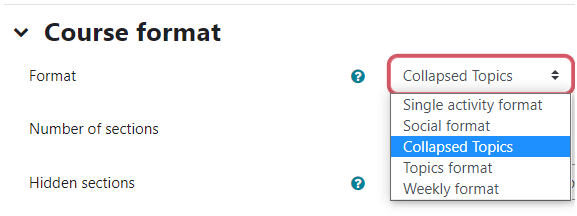
NOTE: If your course is set to any format besides Topics format, you may or may not see content when you go to the new course. The general course template is set to the topics format by default. To change your course back to your desired format, click the “Settings” tab within your course. On the Settings screen, expand “Course Format” and change the Format drop-down menu appropriately. When you return to the course, you should now see all the content in your course.


NOTE: If you need to import content from another faculty member’s course, ask them to add you as a teacher to their original course. You will then be able to select their course when following the import process. The eLearning Department cannot import content from another instructor for you without the instructor’s permission.
Revised: Dec. 2022
